


Fruit Trees Growing
Siting fruit trees
Growing fruit trees successfully requires an open situation with plenty of light, shelter from prevailing winds and a freely draining soil. Good light ensures good growth and ripening of fruit. Shelter warms the site improving pollination, growth and fruit production. The ideal soil for fruit trees is a well drained loam that is slightly acid. Avoid sites susceptible to waterlogging.
When selecting the site make allowances for the future growth of the trees. Planting distances between trees should not be too small. Allow for access when the trees have grown and good air circulation. The following distances should serve as a guide for bush trees:
Apples:
MM106 – moderately vigorous – 3.6-5.5m (12-18ft)
M27 – very dwarfing – 1.5-2m (5-7ft)
M9 – dwarfing – 2.4-3m (8-10ft)
M26 – semi dwarfing – 3-4.5m (10-15ft)
M25 – vigorous – 9-12m (30-40ft)
Plums:
St Julien A – moderately vigorous – 3.6-5.5m (12-18ft)
Pixy – semi dwarfing – 3-3.6m (10-12ft)
Pears:
Quince A – moderately vigorous – 3.6-4.5m (12-15ft)
Quince C – semi dwarfing 3-3.6m (10-12ft)
Pyrus communis – (wild pear) – vigorous 9-12m (30-40ft)
Cherries:
Gisela 5 – dwarfing – 2.4-3m (8-10ft)
Different styles:
Espaliers – Apples & Pears (use M26 or MM106) – 3.6-5m (12-15ft)
Fans – Plums & Cherries – 3.6-5m (12-15ft)
Cordons – Apples & Pears (use M26 or MM106) – 60-90cm (2-3ft)
Use ‘maidens’ and use the notes in this guide to help develop the style
Planting your trees.
We supply bare-root trees from November until March. For your tree to get away to a good start a little preparation is advisable. Dig the planting hole a little larger than the root system. Fork over the bottom of the hole. Back-fill ensuring no air pockets are left between the roots consolidating the soil as you go along. It is best not to improve the soil in the planting hole much so as to encourage rooting into the surrounding soil.
If a stake is required insert it before planting on the windward side. Staking on more exposed sites anchors the roots while they establish and should be considered a temporary measure for two or three years. Use short stakes and tie low down. The stem should be able to move in the wind with the roots held firm. Staking is often not required on sheltered sites. Trees on dwarfing rootstocks should be permanently staked.
You should aim to plant your tree at the same height as it was planted in the nursery with the graft union clear of soil level. Tie tree to stake. Do not allow the tree’s roots to dry out during the planting process. Water if necessary. If rabbits are present use a spiral guard for protection. During the first season ensure the tree is well watered during dry spells, and remove any weed competition within a diameter of about 1m (3ft).
Training your tree.
The early years of your tree’s life should be used to build up a framework. This depends on your aims. Remove any fruit in the first year and for the first five years do not let it over fruit. Let the tree concentrate on vegetative growth.
There are various forms that fruit trees can be grown into depending on space and intentions. In the open, bush trees are usually grown. There is also the spindlebush, where a centre leader is maintained. This is usually grown in commercial orchards. For restricted spaces the usual styles are espaliers and cordons for apples and Pears and fans for Plums and cherries.
Bush trees
The aim is to produce a goblet shaped tree open in the centre above a clear stem. The height of clear stem varies depending on intentions and vigour of rootstock.
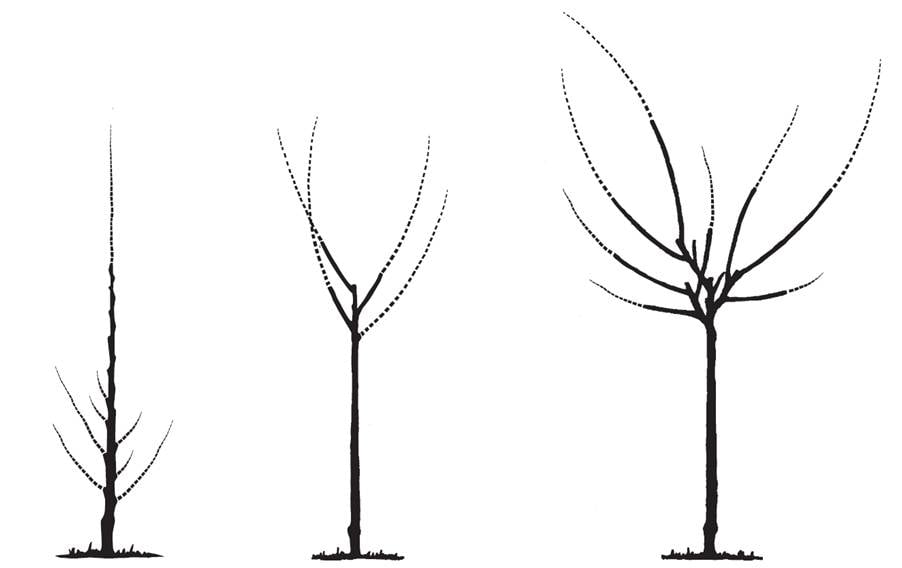
The ‘maiden’ trees supplied will be either feathered, with branches or unfeathered, without branches depending on the variety. For either type the stem must be reduced to:
Dwarf bush – 0.6m (24”) Bush – 0.75m (30”)
Half standard – 1.35m (4’6”)
Standard – 2m (6’6”) – suitable for varieties on vigorous rootstocks.
If the tree has not reached the required height allow it to grow for another year.
Feathered trees
Cut back the main stem to a side shoot at around the required height ensuring that there are two or three well placed side branches below it. Reduce these branches by two thirds to an outward facing bud. Remove all other branches to the stem. In the summer a number of laterals will be produced from the primary branches. In the winter select about four laterals on each primary. Reduce them and extension growth on the primary branch by up to half. Cut all branches not required as secondary branches back to four or five buds.
Unfeathered trees
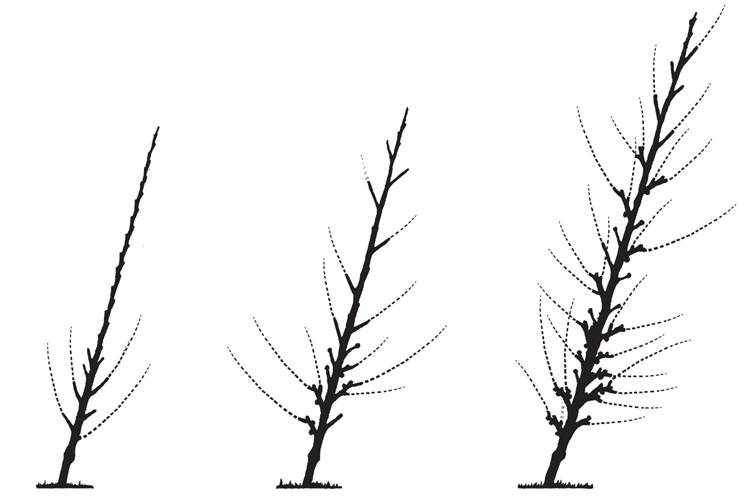
After planting reduce the stem to the height depending on the type of bush tree you are planning to grow. Cut back to just above a bud using a sloping cut ensuring that there are some healthy buds below it.
The following winter chose the best three or four evenly spaced branches, ideally with wide angles to the main stem. Wide angles mean stronger branches. Reduce these by half to an outward facing bud and remove the unwanted branches flush with the main stem.
During the summer a number of laterals will be produced from the primary branches. In the third winter select about four laterals on each primary. Reduce them and extension growth on the primary branch by between half and a third. Cut all branches not required as secondary branches back to four or five buds.
From now on the tree should be bearing fruit and pruning becomes lighter. Remove any growth crowding the centre of the tree where poor quality fruit will be produced.
Pruning times
The above pruning process applies to all fruit trees. However the timings vary. Apples and pears winter prune as detailed. Prune plums in early spring and summer to guard against silverleaf disease. Cherries should be pruned early spring at bud burst to prevent bacterial canker.
Cordons
For small gardens, against walls and fences cordons are ideal taking up little space. Each tree becomes a trunk with short side branches on which fruit forms.
Before planting attach lines of wire 30cm apart starting at 60cm above the soil to the wall or fence. Plant ‘maiden’ trees at 45º with the graft union uppermost 60-90cm (2-3ft)apart, about 15cm (6ins) away from the fixed structure to allow for growth, tying them to long canes attached to the horizontal wires.
After planting reduce any side branches to four buds. If few side shoots are present reduce leader by a third, this will promote side shoots. In the first summer remove any developing fruits.
From now on cordons are summer pruned from late July in the south to late august in the north. Reduce mature current season growth 25cm (9") or longer back to three leaves if arising from the main stem, or one leaf above the basal cluster if coming from last summers branching. Do not prune any shoots that do not reach 25cm, they may well have fruit buds. Allow fruiting to increase gradually as the tree develops.
Espaliers
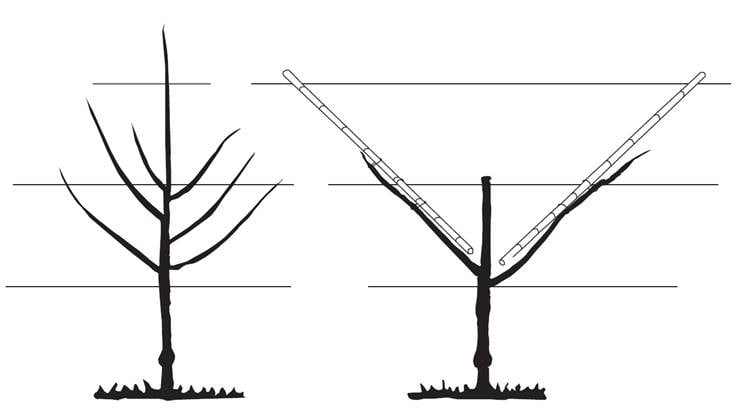 Like cordons espaliers are ideal for walls and fences. They can also be developed to create a boundary within a garden. Plant ‘maiden’ trees, they are ideal for training. Plant 3.6-5m (12'-15') apart if more than one is to be grown and about 15cm (6ins) away from any fixed structure. In the winter of planting a horizontal support wire is attached to the wall or fence about 30cm (12ins) above soil level. The tree is cut back to a bud 5cm above the support wire.
During the early summer the shoot from the uppermost bud is allowed to continue vertically supported by a cane while those from two opposite buds immediately below are trained in to form the first tier of branches. At first they are tied in to bamboo canes at 45º, later brought down horizontally to the bottom wire and their permanent position. Any other shoots that develop cut back to three leaves in June or if too low are removed altogether.
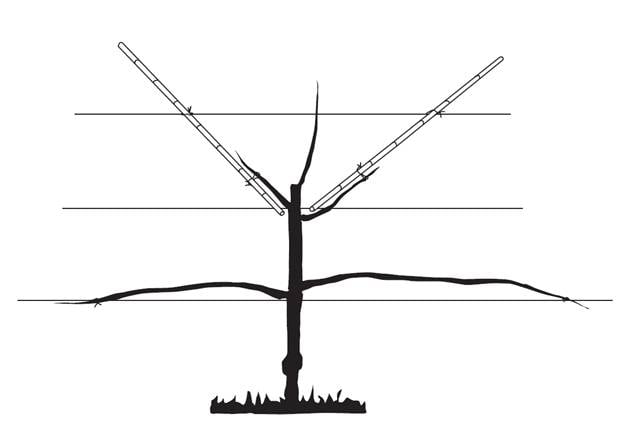
In the second winter put in place another horizontal support wire up to 45cm (18ins) above the lower tier and prune the vertical shoot to a bud 5cm above it. The whole process is repeated in the second summer on the second tier.
If, when planting the ‘maiden’ tree, there are strong side shoots around the height of the wire retain two to start the first tier, cut back any others and reduce the main stem to about 60cm (24"), the height of the second tier. In the first summer treat the side branches and new shoots to form the second tier as explained above.
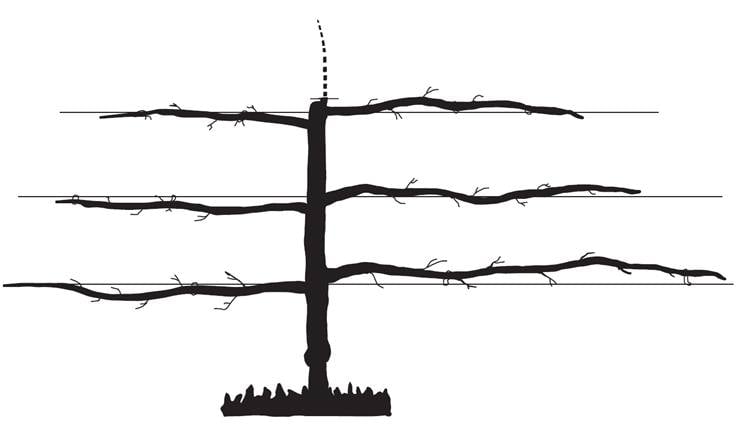
The process is repeated for as many years as the number of tiers required. If one shoot grows stronger than another lower the strong shoot to the horizontal leaving the weaker one to continue more vertical. Once growth has evened out tie the other down.
Laterals will develop on the side branches. These should be summer pruned like cordons. Allow tree to fruit gradually, each year allowing more fruits to develop. When horizontal branches have reached their extremity cut back to a leaf or a lateral.
Step overs are just single tier espaliers and are grown in the same way but without the central upright shoot. They can edge a vegetable plot or be grown next to a path without hindering access or shading other plants.
Fan training
For fan training plums choose a warm south facing location. Plant a ‘maiden’ tree 15cm (6") from a wall or fence. Plant it to tilt slightly back to the structure behind it. Cut the tree to 60cm(24") high to a healthy bud, ensuring that there are healthy buds or lateral branches below. Cut any laterals hard back to a healthy bud.
Prepare the supporting structure using a series of horizontal wires 15cm (6") apart starting off from 30cm(12") The length of the wires depends on the eventual space the fan is to take up.
Early in the first summer select three shoots, a leader which is allowed to continue growingupwards, and two laterals, one to the left, the other to the right. Remove any other shoots. In June/July attach the side shoots to canes and attach to the wires behind at about 45º. Remove the central leader to just above the laterals.
Cut back laterals to 30-45cm(12-18") to a growth bud and wound paint in February. In the second summer select four shoots from each lateral. One to carry along the cane, two above the main arm and one below. Tie them in. Prune back any further shoots.
In February reduce each lateral shoot by a third to a downward facing growth bud. In the third summer allow these shoots to extend. Allow three side shoots to grow from each lateral. Tie them in. In late summer pinch out the tips of the shoots. This will encourage fruiting the following year.
In June / July in following years as new shoots grow pinch out the growing tips once they have made six or seven leaves. This will develop the fruiting spurs. In late summer after fruiting cut back these pinched out shoots to three leaves to encourage fruit buds to form for the next year.


